


Git is a free and open-source model management system. Being the preferred model management system, most programmers work together with Git every day. A model management system is a instrument for pc scientists to maintain monitor of the adjustments made to code being developed. Mainly, a developer can save an preliminary model of their supply code to Git, then when a person updates their code, it can save you it once more iteratively in order that later a person can reference or overview a earlier model of that code sooner or later.
For this text, I might be utilizing the command line interface and terminal to work together with git and commit recordsdata to Github. If later you’re feeling the necessity for a extra streamlined work course of, I encourage you to seek for the Git integration instruments you’ll need on your most well-liked Built-in Improvement Atmosphere purposes. For myself, I’m utilizing the Visible Studio Code IDE software from Microsoft in my improvement course of, which you’ll be able to obtain at no cost right here.
Learn: Visible Studio Git Stash
What Are Frequent Git Phrases a Developer Ought to Know?
Earlier than getting began, allow us to briefly talk about just a few phrases. As a pc scientist, you will have come throughout phrases and phrases like listing and command line. Listing is a folder on the pc and the command line is a textual content editor software that works as an interface between the person and the pc. Many applications could require the usage of this Command Line Interface (CLI) so as to work together with them.
Whereas Git could be run utilizing purposes, on this article we’ll study to make use of Git by means of its instructions within the CLI. Some instructions to familiarize your self with embrace cd (standing for change listing), which permits a person to relocate to a distinct listing utilizing that command, adopted by the trail of the specified listing.
Those who write code perceive that one can write code wherever utilizing any textual content doc; as an alternative, there are specialised purposes known as code editors that permit a person to write down and edit code with featured help. A repository is the place a mission is saved. It may be a listing on the pc or a hosted mission on Github.
Folks generally get confused between Git and Github. Git is the instrument builders use to overview adjustments of their supply code, whereas Github is the web site builders can host their code on. There are a number of websites like GitHub that may be known as distant repositories; different examples of distant repositories embrace BitBucket, SourceForge, and GitLab.
Learn: 6 Greatest Python IDEs and Code Editors
Git Instructions To Get Began
The next is an inventory of Git instructions it’s good to get began creating, cloning, and dealing with repositories and codebases.
- clone: permits a person to take a repository that’s hosted on GitHub or the same web site and obtain it right into a person specified folder on their native machine.
- standing: this command permits a person to see details about the repository and department they’re working in and to see the standing of the recordsdata in that listing.
- add: when a person makes adjustments to a mission by updating, transferring, creating, or deleting recordsdata, they’ll have Git monitor these adjustments utilizing this command.
- commit: permits a person to avoid wasting their recordsdata in Git.
- push: this command uploads Git commits to a distant repository.
- pull: obtain an up to date model of the identical repository from a internet hosting web site.
Now that now we have gone over a few of the fundamentals, allow us to begin establishing Git and our surroundings.
Set up Git
In case you are utilizing a MacOS or Linux machine, chances are high you have already got Git put in. You possibly can test this by working the command git –model within the terminal. If an error happens, then you’ll need to put in Git by working one of many following instructions:
- dnf set up git-all for RPM-based linux distributions like Fedora
- apt set up git-all for Debian-based linux distributions corresponding to Ubuntu
- brew set up git-all for MacOS
For Home windows, you’ll need to obtain the Git for Home windows installer.
How Do I Setup Git?
After putting in Git, we’ll wish to set it up. Customers are in a position to arrange configuration variables utilizing the Git config instruments offered. All international configurations are saved by Git within the .gitconfig file, discovered in your house listing. Utilizing the command choice –international, set configuration values as international; omitting this feature then solely configures the present Git repository. You may additionally wish to customise system vast configurations. Git manages the configuration of every person and Git repository, storing them as values within the /and so forth/gitconfig file. To set or handle these values, you’ll need root rights earlier than utilizing the –system choice.
Now, it would be best to set a username and electronic mail into Git after putting in it. That is necessary, as Git makes use of this data to maintain monitor of the commits being made.
To set the username, use the command git config –international person.title “Your Title”
To set the electronic mail id, use the command git config –international person.electronic mail “[email protected]”.
You may additionally select to configure the default textual content editor that might be used every time Git requests you to write down a message. In any other case, Git will use the default editor of your system.
To set your personal most well-liked editor, chances are you’ll want to seek out the command choices particular to your desire. Some examples embrace:
$ git config --global core.editor “nano -w”
$ git config --global core.editor emacs
$ git config --global core.editor “atom --wait”
$ git config –international core.editor “'C:Program FilesSublime Textual content 3sublime_text.exe' -w”
For extra examples, take a look at the documentation at Git-scm.com.
Since these instructions use the –international choice, this data might be used for each Git repository within the system. To make use of a distinct affiliation for particular initiatives, run these instructions with out the –international choice.
Proceed to discover your choices and make Git your personal trendy and environment friendly instrument as you proceed to depend on it, together with the remainder of your developer toolset.
You possibly can view your settings for Git utilizing the next command:
$ git config --list or git config -l
You may as well test particular configuration parts through the use of git config .
For instance:
$ git config person.title
Your title
Begin utilizing Git in your initiatives by executing the git init command within the listing you wish to begin maintaining monitor of in Git. We’ll go over this extra a bit of later.
Learn: The Prime Java IDEs
Setup and Use GitHub
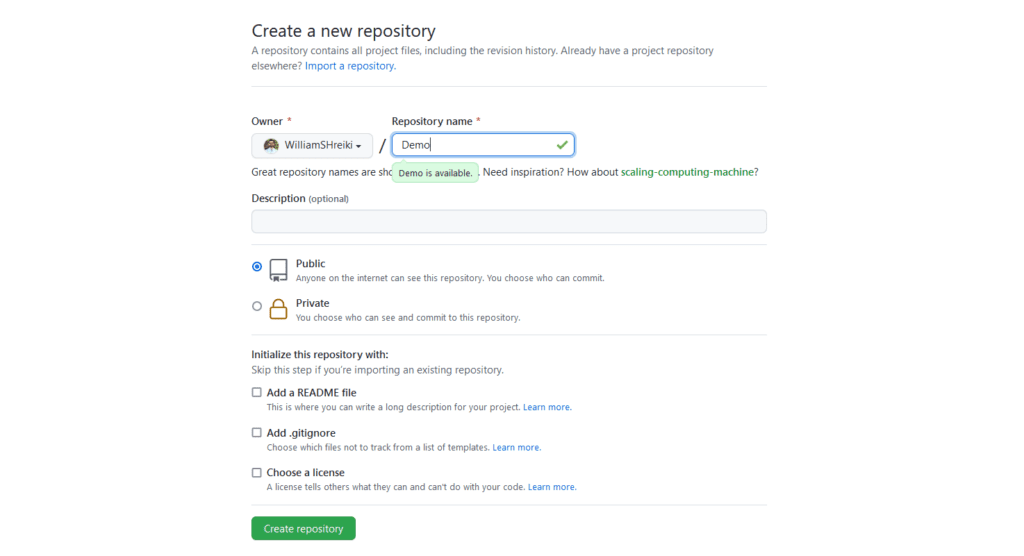
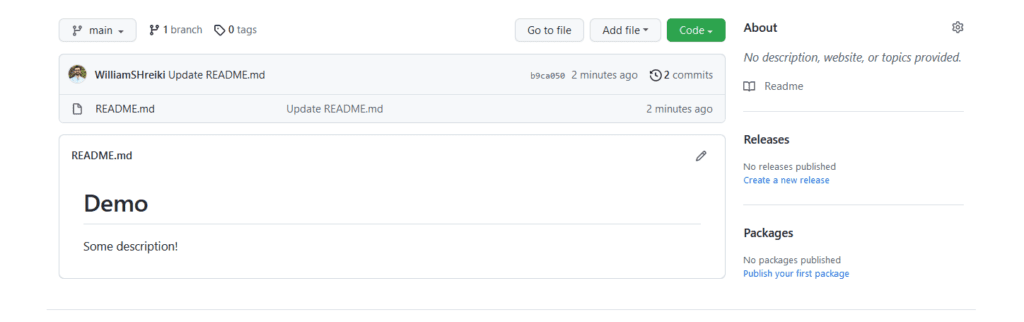
We’ll wish to have an account with a web-based code repository host. For this text, we’ll undergo establishing the Git setting with GitHub. Use the inexperienced “New” button to create a brand new repository with “Demo” because the title and hit the “Create repository” button.
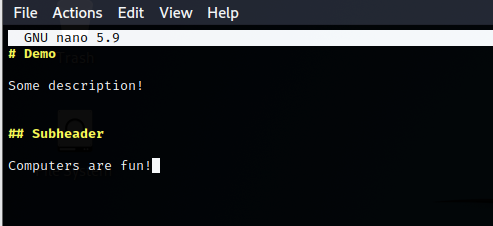
Proceed to make use of the “create new file” button to create what is named a “learn me” file. It is a file normally written within the markdown (.md) format that offers you the chance to reveal a extra detailed description concerning the mission you’re engaged on.
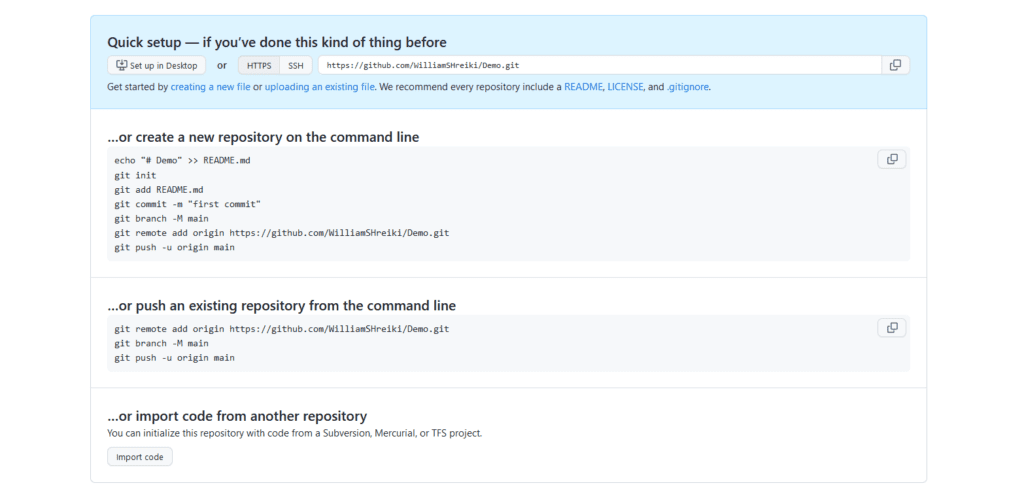
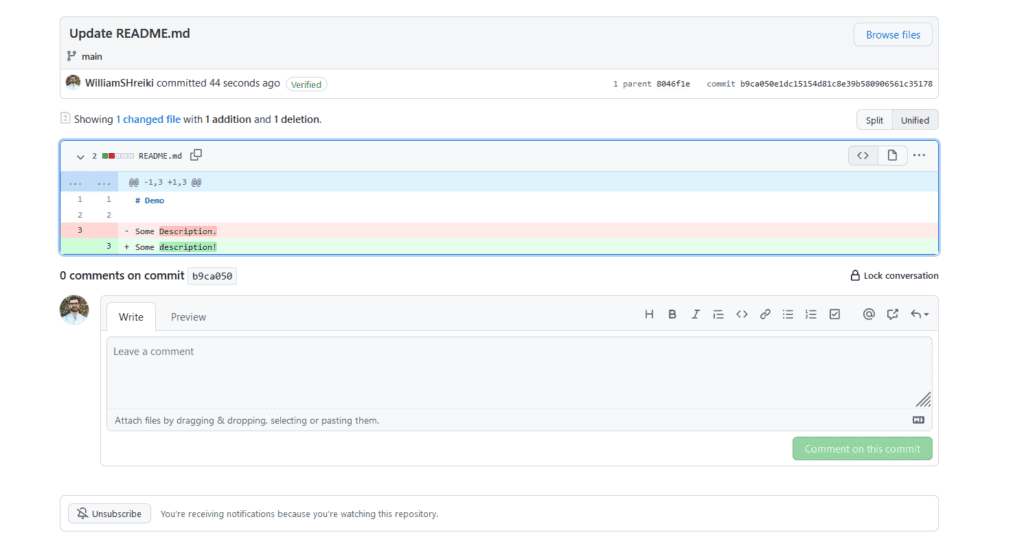
Writing the title README.md for its title, write an outline inside stated file, then proceed to commit this new file utilizing the inexperienced button proven within the picture under. This can save your adjustments within the new repository and you will notice it introduced as within the following screenshot:
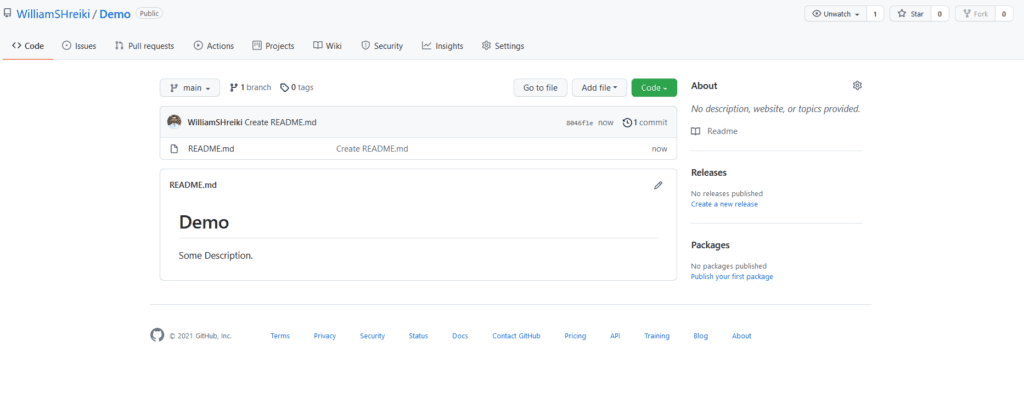
Utilizing the “Edit this File” button (the one that appears like a pen), you may freely edit the file you simply made. After enhancing your README.md file, hit commit once more.
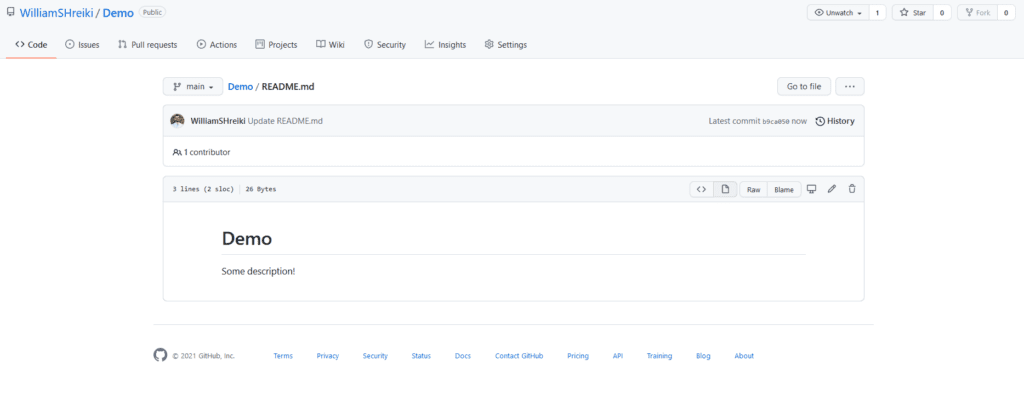
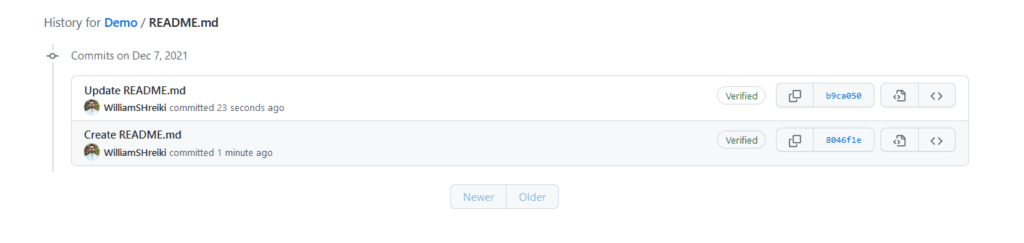
Going to your Demo repo’s principal web page, you may see your most up-to-date commit, together with its message (should you wrote one on the time of committing). Within the nook of the repo’s headliner, you may see a hyperlink both labeled “historical past” or the variety of commits you will have made on this repo.
In the event you click on this, you may see a timeline of commits with a novel identifier for every, together with the titles and the messages given to them. Clicking on one will present you the adjustments made to the file these commits are associated to.
Git and GitHub
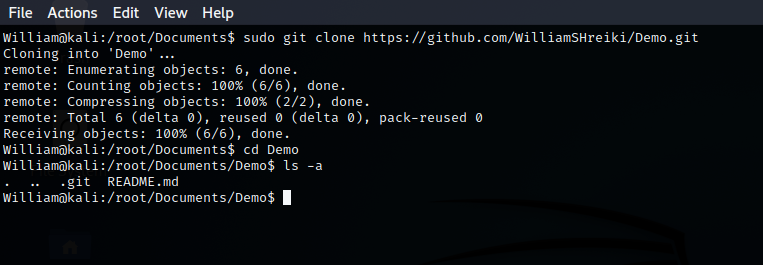
Up to now, now we have began utilizing GitHub to create a repository, however now we have additionally ready Git on our personal pc to trace code made and edited there. Now let’s see how we are able to use each in tandem. The way in which we are able to work on on-line code domestically is by cloning the repository onto our native machine and monitoring it there too. In your GitHub web page, go to your repository and discover the cloning hyperlink below the “Code” button. Copy this HTTPS hyperlink, as will probably be used in your native machine to obtain the repository.
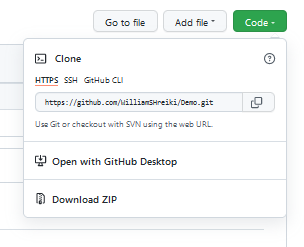
On the terminal of your native system, use the command git clone, together with the copied HTTPS hyperlink – ending in .git – to obtain the repository. This creates the Demo listing the place you executed the command. Navigate into that repository folder. You possibly can see that this repository is already being tracked by Git, as there’s a hidden file inside that listing with the .git title. This file is identical as when you will have created a Git repository domestically by executing the command git init.
Now, use your most well-liked textual content editor to edit the ReadMe file within the repository.
Perhaps you wish to add one other file to the repository. Use your textual content editor to create an HTML formatted file. Executing the command git standing exhibits you the standing of recordsdata in your repository. As you may see, the README.md file, which is already tracked by Git, is proven as modified, whereas the brand new index.html file is proven as untracked.
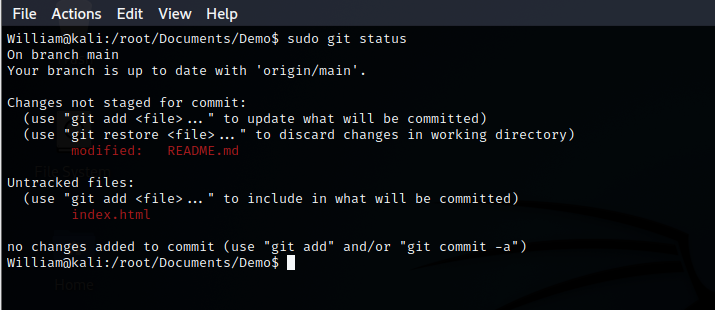
You possibly can add new and modified recordsdata to Git utilizing the git add command choice. Including a interval to that command signifies including all of the recordsdata within the repository. Utilizing the standing command once more, you may see that the recordsdata at the moment are staged and able to be dedicated.

Committing your staged recordsdata enters them into the .git file as an iteration of your workflow. Use the git commit command and enter a remark utilizing the -m choice. This feature really populates the title of the feedback for this commit; use a second -m to write down extra feedback for these commits.

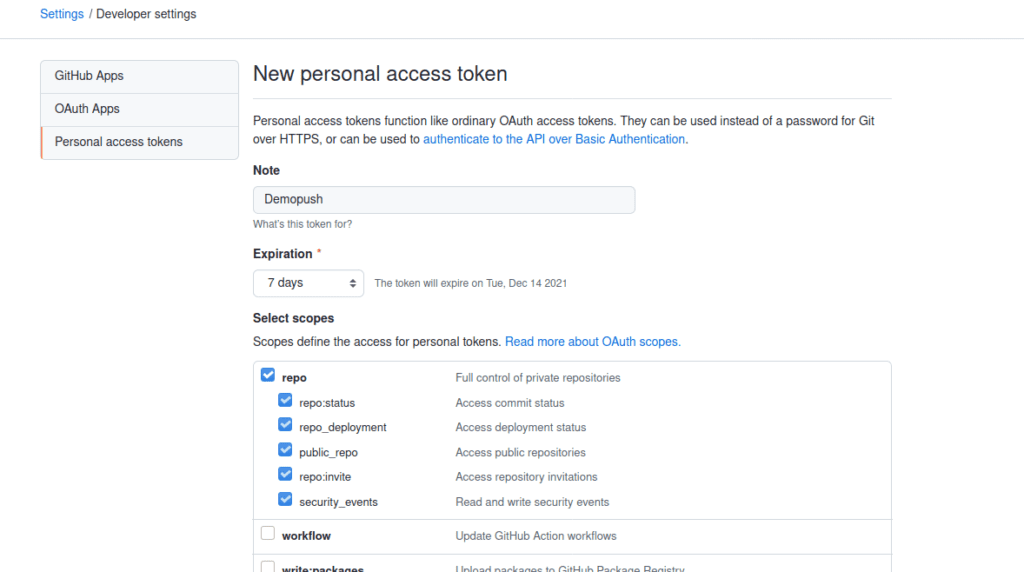
Now that now we have ready every little thing for our code to be tracked domestically, our subsequent step is to push it for the repository to be up to date on-line as nicely. Earlier than we are able to do that, we’ll want a token from GitHub to securely add our code. For that, we should always return to GitHub. Underneath settings, go to developer settings, hit Private entry tokens, and generate a brand new token.

You can be taken to a menu the place you’ll select what entry this token permits for. Decide the repo choices as these will permit us to push and pull repository recordsdata.
You will notice a set of characters generated for you – that is your token. Copy this to be used in your native machine. This can permit us to add the code made domestically into GitHub over a HTTPS connection. Later, you may additionally select to make use of SSH keys to hook up with your repository. In your command line interface, use the command git push to add your adjustments to the repository. Make sure to use the choices origin and principal, as try to be working with that replicate of the recordsdata you’re working with and the department you’re working in. You can be prompted for the username and password of your GitHub account; use the identical username, however use your generated token as an alternative of the account password.

Return to your GitHub and you will notice that the repository you will have created has been up to date with the adjustments you made in your native system.


In the event you resolve to replace this similar repository on GitHub, you need to use the git pull command in your native machine to replace your domestically linked repository.
Conclusion to Getting Begin with Git Tutorial
Now, you will have arrange and used each Git and GitHub for a mission, and you’re prepared to make use of these instruments in additional initiatives. Sincerely, these might be efficient instruments on your improvement course of, and I encourage you to discover extra of each Git and GitHub.


![[Review] Airbot Robotic Vacuum Mop L108S Pro Ultra features](https://newselfnewlife.com/wp-content/uploads/2024/04/airbot-robotic-vacuum-L108S-pro-ultra-001-120x86.jpg)
